Hi, everyone!
Today we are going to show the steps for configuring MongoDB 3.3.4 with Spring Boot 1.5 in Windows 7.
First you have to download the MongoDB:
Here you have the official link: https://docs.mongodb.com/manual/installation/
Now here is the most important think, that don't tells the manual of mongodb:
You have to download the Windows parche: Windows6.1-KB2999226-x64.msu and it will add a dll file that is necessary for running MongoDB.
Then, you have to create the directory C:/db/data.
Then, when MongoDB is installed and you have create the directory, you have to run the file C:\Program Files\MongoDB\Server\3.4\bin\mongod.exe.
This file will open the MongoDB connection.
Here you have MongoDB running!
For the other side, you have to configure your mongoDB database connectio and driver in Spring Boot configuration.
You have to create a file named application-{environment}.yml with the next content:
spring:
datasource:
url: jdbc:oracle:thin:@//localhost:27017/howdyl
driver-class-name: mongodb.jdbc.MongoDriver
jpa:
show-sql: true
hibernate:
showSql: true
dialect: org.hibernate.dialect.Oracle10gDialect
And the magic, you run your application a mongoDB is running.
For any question, ask me!
Try it and have fun!
miércoles, 26 de abril de 2017

martes, 18 de abril de 2017
Keys for configure Bootstrap 3 in Angular 4 Project!
Hi,
Today, I'm going to explain the steps for configure Bootstrap in an Angular application.
First of all, we have to add Bootstrap in our application with:
> npm install --save ngx-bootstrap@latest
Then, we have to open the index.html file and add:
You have to know that any div with class col-**-** need a parent div with class row.
Today, I'm going to explain the steps for configure Bootstrap in an Angular application.
First of all, we have to add Bootstrap in our application with:
> npm install --save ngx-bootstrap@latest
Then, we have to open the index.html file and add:
<link
rel="stylesheet"
href="https://maxcdn.bootstrapcdn.com/bootstrap/3.3.7/css/bootstrap.min.css" />
Then, we have all we need for use Bootstrap 3 in Angular 4.
Now, we have to configure all the html files following the structure:
<div class="row">
<div class="col-xs-12 col-sm-6 col-lg-3">
...
</div>
... (any repeations you need)
</div>
You have to know that any div with class col-**-** need a parent div with class row.
Also, you have to know that col-xs is for mobiles dispositive, col-sm for tablets dispositives and col-lg for computer dispositive.
Here you have the documentation of the Bootstrap 3 style; All you need is here:
When you domain all this css styles, you can improve new approach for your develops.
Try it and have fun!
lunes, 10 de abril de 2017
How to migrate an Angular 2 Project to Angular 4?
Hi people,
Angular is growing ;) and now we have to migrate it to be updated!
The steps to upgrade to angular 4 are as follows:
First of all verify the Node Version:
Then, we are going to actualice angular/cli:
Angular is growing ;) and now we have to migrate it to be updated!
The steps to upgrade to angular 4 are as follows:
First of all verify the Node Version:
> node -vThen, we are going to actualice angular/cli:
First, we have to remove the actuals possibles versions:
> npm uninstall -g @angular/cli> npm uninstall -g @angular-cli
Then, we are going to install it again:
> npm install -g @angular/cli> ng -v _ _ ____ _ ___
/ \ _ __ __ _ _ _| | __ _ _ __ / ___| | |_ _|
/ △ \ | '_ \ / _` | | | | |/ _` | '__| | | | | | |
/ ___ \| | | | (_| | |_| | | (_| | | | |___| |___ | |
/_/ \_\_| |_|\__, |\__,_|_|\__,_|_| \____|_____|___|
|___/
@angular/cli: 1.0.0
node: 6.10.2
os: win32 x64
In Windows PC:
npm install @angular/common@next @angular/compiler@next @angular/compiler-cli@next @angular/core@next @angular/forms@next @angular/http@next @angular/platform-browser@next @angular/platform-browser-dynamic@next @angular/platform-server@next @angular/router@next @angular/animations@next --savenpm install @angular/{common,compiler,compiler-cli,core,forms,http,platform-browser,platform-browser-dynamic,platform-server,router,animations}@next --save> npm install typescript@2.2.1 --save> ng serve
viernes, 31 de marzo de 2017
How to generate a Method with Generic Classes in Java?
Wellcome again,
Today I'm going to explain how to generate methods with generic classes in the call in Java.
First of all, I'm going to show you an example:
public <T> T convertirDesdeXml(Class<T> c, byte[] xml) {
XStream xStream = new XStream();
xStream.alias(c.getSimpleName(), c);
T objecte = (T)xStream.fromXML(new String(xml));
return objecte;
}
This example converts an xml in byte[] format to a generic object.
We have to use a placeholder that is presented with <T> syntax. A placeholder is a String name that represents any object type that you will use in the context (the class, a method, an static call, etc.).
The placeholder <T> indicates that you can use the class T like a generic type in the method.
You can complicate the call like <T extends java.util,Map>. This new example indicates that the placeholder T extends the interface Map or, what is the same, the operator instanceof returns true.
You can complicate the call like <T, K>. In this example you use two placeholder and you can you the number of placeholder you want.
With the placeholder you have your first generic method with generic classes.
Thanks for the read!
Try it and have fun!
miércoles, 8 de febrero de 2017
How to obtain the language in the browser and externalice with it in Angular 2?
Hi everybody!
Here we comes with another question.
Today the theme is Angular 2, Javascript and the navigator class.
With this code we will obtain the language from the browser:
loadLanguage() {
let idioma = navigator.language;
if(idioma === 'ca' || idioma == 'es' || idioma == 'gl' || idioma == 'va' || idioma == 'eu' || idioma == 'en' || idioma == 'fr') {
this.idioma = idioma;
} else {
this.idioma = "en";
}
}
Navigator is a Javascript class that returns the language and other interesting things.
Show the nagivator object with console.log(navigator); to see what are you interested in.
Another question related with this theme is to externalice the content of your web in Angular2.
For do that I pass you my example code:
Here we comes with another question.
Today the theme is Angular 2, Javascript and the navigator class.
With this code we will obtain the language from the browser:
loadLanguage() {
let idioma = navigator.language;
if(idioma === 'ca' || idioma == 'es' || idioma == 'gl' || idioma == 'va' || idioma == 'eu' || idioma == 'en' || idioma == 'fr') {
this.idioma = idioma;
} else {
this.idioma = "en";
}
}
Show the nagivator object with console.log(navigator); to see what are you interested in.
Another question related with this theme is to externalice the content of your web in Angular2.
For do that I pass you my example code:
This method loads the dictionary with all the traductions and the possible languages:
| loadDictionary() { this.dictionary = { titol: {ca: 'El Temps a Espanya!', es: '¡El Tiempo en España!', en: 'The Weather in Spain!', fr: 'String1InSpanish', gl: 'O tempo en España!', va: 'El Temps a Espanya!', eu: 'Eguraldia Espainian!'}, descripcio: { ca: 'Troba les prediccions meteorològiques de tots els municipis espanyols durant els propers quatre dies.', es: 'Encuentra las prediciones meteorológicas de todos los municipios españoles durante los próximos cuatro días.', en: 'Find weather forecasts for all Spanish municipalities over the next four days.', fr: 'Trouvez les prévisions météo pour toutes les municipalités espagnoles au cours des quatre prochains jours.', gl: 'Atopar as previsións do tempo para todos os municipios españois durante os próximos catro días.', va: 'Troba les prediccions meteorològiques de tots els municipis espanyols durant els propers quatre dies.', eu: 'Aurki eguraldi Espainiako udalerri guztietako iragarpenak hurrengo lau egunetan zehar.'} }; } This method obtaions the translation of a key string in a language: getTranslation(inStringId: string, inLanguageId: string) { let labelTexts = this.dictionary[inStringId]; let translation; if (labelTexts) { translation = labelTexts[inLanguageId]; } if (translation == null) { translation = inStringId; console.error(inStringId + ' has no defined text for language ' + inLanguageId); } return translation; } And this method loads the texts you need in your web: loadTexts() { this.titol = this.getTranslation("titol", this.idioma); this.descripcio = this.getTranslation("descripcio", this.idioma); } This is my way! There are another possibilities! For any questio, don't doubt ask me! Try it and have fun! |
lunes, 30 de enero de 2017
Use cases of this.http.get in Angular 2
Hi everybody!!!
Here we comes with news explanations! Today the theme is how to use the sentence this.http.get! When use on one way or another? And why?
The question you have to do is... do you want a Sincron or Asincron call?
A Sincron call is when you want that the process occurs in the main thread. On this way, the sequence of the next process don't occurs until the call finish.
For do a Sincron call, you have to do the call like this:
This sentence will return a json data file. If you want to return a content file (binary or others types) you have to change data.json() call by data.text().
An Asincron call is when you want to create a new thread from the main thread. On this way, the senquence of the next process will continue and our thread will continue on parallel.
For do an Asincron call, you have to do the call like this:
Here we comes with news explanations! Today the theme is how to use the sentence this.http.get! When use on one way or another? And why?
The question you have to do is... do you want a Sincron or Asincron call?
A Sincron call is when you want that the process occurs in the main thread. On this way, the sequence of the next process don't occurs until the call finish.
For do a Sincron call, you have to do the call like this:
this.http.get(url).map( data => data.json() )
This sentence will return a json data file. If you want to return a content file (binary or others types) you have to change data.json() call by data.text().
An Asincron call is when you want to create a new thread from the main thread. On this way, the senquence of the next process will continue and our thread will continue on parallel.
For do an Asincron call, you have to do the call like this:
this.http.get(url)
.subscribe(
data => this.data = data.json(),
err => this.handleError,
() => {console.log('complete call') /*do something when finish*/}
);
This sentence will process an Asincron call and you can do want you want with the data json file obtained on the complete pass. This call is used in the onInit of the component normally and usually loads a data json file necessary for something on the application (a data project information, a data language properties or what you need or want).
I hope you have found interesting this article.
You can ask me any question or doubt!!! And you are free for share them with your friends!!!
Try it and have fun!
lunes, 7 de noviembre de 2016
Bind json data to tree component with Angular 2
Here we come again!
Today with news of a useful component that can shows you the way to continue your own components in Angular2.
Here you can see the demo (click the Project link button).
We have two components: the tree component and the node component (the tree component is an array of node components).
Take a look to the tree.component (html and css files):


And here is the ts file:

You can see that we don't need a css file and the html iterate an array of node and calls the app-node-tree with the root properties.
Now take a loot to node.component (html and css files):

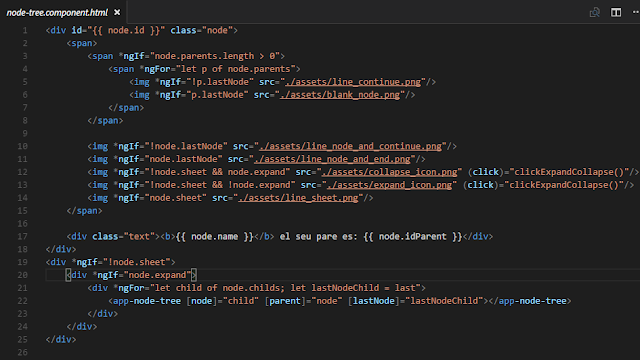
Here we can see the styles of my node, setting the div and img style's and the html file. There is a div with the images that we have to load on the node and later we iterate the array of children of the node.
We use a recursive component, because we call the aap-node-tree in an app-node-tree.
Take a look to ts file:

In this Typescript file we load the node with the loadNode method. The ancestors and the property lastNode indicates whether the node is the last sibling of the same parent.
There is a method that change the state between expand and collapse of the image in the node.
At last, we will see the tree.json file with the structure of our tree, that we can change with the structure we want:

On my example, we have to repeat this structure three times and we will get our tree.
I hope you find this article interesting!
Here you can see the example.
This example is done with Angular-cli.
Here you can find the repository of the component done by @davidnezan.
Try it and have fun!
Today with news of a useful component that can shows you the way to continue your own components in Angular2.
Here you can see the demo (click the Project link button).
We have two components: the tree component and the node component (the tree component is an array of node components).
Take a look to the tree.component (html and css files):


And here is the ts file:

You can see that we don't need a css file and the html iterate an array of node and calls the app-node-tree with the root properties.
Now take a loot to node.component (html and css files):


Here we can see the styles of my node, setting the div and img style's and the html file. There is a div with the images that we have to load on the node and later we iterate the array of children of the node.
We use a recursive component, because we call the aap-node-tree in an app-node-tree.
Take a look to ts file:

In this Typescript file we load the node with the loadNode method. The ancestors and the property lastNode indicates whether the node is the last sibling of the same parent.
There is a method that change the state between expand and collapse of the image in the node.
At last, we will see the tree.json file with the structure of our tree, that we can change with the structure we want:

On my example, we have to repeat this structure three times and we will get our tree.
I hope you find this article interesting!
Here you can see the example.
This example is done with Angular-cli.
Here you can find the repository of the component done by @davidnezan.
Try it and have fun!
Suscribirse a:
Entradas (Atom)