Mostrando entradas con la etiqueta component. Mostrar todas las entradas

lunes, 7 de noviembre de 2016

Bind json data to tree component with Angular 2

Here we come again!

Today with news of a useful component that can shows you the way to continue your own components in Angular2.

Here you can see the demo (click the Project link button).

We have two components: the tree component and the node component (the tree component is an array of node components).

Take a look to the tree.component (html and css files):


And here is the ts file:


You can see that we don't need a css file and the html iterate an array of node and calls the app-node-tree with the root properties.

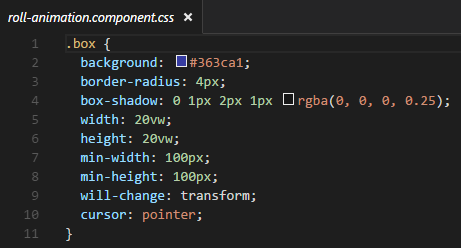
Now take a loot to node.component (html and css files):


Here we can see the styles of my node, setting the div and img style's and the html file. There is a div with the images that we have to load on the node and later we iterate the array of children of the node.

We use a recursive component, because we call the aap-node-tree in an app-node-tree.

Take a look to ts file:


In this Typescript file we load the node with the loadNode method. The ancestors and the property lastNode indicates whether the node is the last sibling of the same parent.

There is a method that change the state between expand and collapse of the image in the node.

At last, we will see the tree.json file with the structure of our tree, that we can change with the structure we want:


On my example, we have to repeat this structure three times and we will get our tree.

I hope you find this article interesting!

Here you can see the example.

This example is done with Angular-cli.

Here you can find the repository of the component done by @davidnezan.

Try it and have fun!

lunes, 31 de octubre de 2016

Animate Components with Angular 2

Here I come again!

In this time, I am going to explain how to animate components with Angular2. I do the next animations: bounce, fade, flip, roll, rotate, zoom and others.

Here you can see the demo (click the Project link button).

First of all, we will take a look to the structure of the components I developed.

We need, like in all Angular2 projects, an app.module.ts:


We have the root component. The real components we will use extends them and gets his properties:


Now we are going to explain an example animation. All animations go by the same way. If you understand one, you are going to understand all.

I choose the roll-animation.component.ts, because is the most easy to explain and to learn too.

We have three parts of a component: the css file, the html file and the typescript file).

The css file and the html file:


The typescript file:


In this file, we could see that the component RollAnimationComponent extends the RootAnimationComponent.

The other important thing you must look at is the attribute animations of the @Component. We can see, there's a trigger for ever event, that is defined by a transition that it is applied to any change of the component. And into the transition, we have different animations that will occur in any change of the component.
Any animate have a time (in miliseconds) and a transformation style. In this example, we could see a translate3d and a rotate3d and how change the opacity and the offset.

And finally, the easiest think. With only one line we call the component in my html file:


Here, in my domain, you could take a look to my animations (http://davidmartinezros.com/Angular2/components-animations-project/).

My project was inspired in this other project (http://daneden.github.io/animate.css/.) has done in AngularJS.

This is the repositori of my project where I develop my animations.

Here you can find the documentation in angular.io to do your animations.

Try it and have fun!

miércoles, 26 de octubre de 2016

Bind json data to html table with Angular 2

Here I come again!

In this example I will show how to bind a JSON file with an html table with Angular2 (the new version of AngularJS, but with Typescript).

Here you can see the demo (click the Project link button).

We need a Service Object and a Component Object and I'm going to use Angular-cli to create them.

First of all, take a look to Service class:

(we will create them with: ng generate service [my.servicename.service])

And I make the next modifications:


The Service returns an Observable of any type, that makes asyncron the call from the Component. So you can extend the code by using any structure of JSON file and making some modifications.

Now I will show you the Component, that we will create with the instruction (ng generate component [componentname.component]):


The Component will call our Service and save the information of the JSON file.

Now comes the HTML file and the CSS file:


Here you can see the use of ngFor, the declaration of a variable with "let" and the attribute "async" that makes asyncron our request.

The JSON file will look like this. You can put the attributes you want, but it's important that the HTML file have the sames name of the JSON file's attributes.


And finally, I can show you the structure of the project that has been done with Angular-Cli, as I said in the beginning.


This is my Git Repository where I push this project and you can get it: https://github.com/davidmartinezros/bind-json-array-to-html-table.

Thanks for reading me, I hope it will help you!

Try it and have fun!